
AK-103, circa 2006
Izhevsk Arsenal (Saiga-based Home Built Clone)
Projects Page 26
I want to introduce a very talented builder to kick off a special article series aimed at the do-it-yourself segment of the hobby. In the past, many builds presented here at Avtomats-In-Action were assembled with the help of professional commercial builders. Redirecting out attention somewhat, this article is geared more towards the DIY enthusiast and I can think of no better example of the outstanding results accomplished by hard working individuals than this super clean Ak-103 project Thirtycal recently completed. His professional assembly and detailing are a testament to the deep knowledge, skills and masterful techniques he has developed and successfully employed. His desire and ability to meet the highest quality standards is outstandingly apparent, and I thank him for the fine images and personal step-by-step build notes you see here! --Tantal
Builders Showcase presents
Thirtycal
It's very
fun to collect and shoot Kalashnikov rifles, but for me it's even more fun (and
satisfying) to research and build them. Since completing this project, I've
built several other AK variants – but this AK-103 clone is still my favorite.
This was officially my “indoctrination” into the world of AK home-building, and
I'm glad I picked an AK-103 clone as my first project. Not only is the AK-103 a
modern 7.62mm beauty, it's also a thoroughly documented variant. I spent about 2
months combing the internet, searching for authentic reference photos, and
reading every forum entry I could find on the subject of the Izhmash AK-103. Of
great help was the excellent documentation and photos I found here at Tantal's
website. Without the information and photos I found here, and the outstanding AK
replicas of Ted Marshall and Chris Butler (as a photographic model), I don't
think I would have been able to build this AK-103 clone.
--Thirtycal
BUILDER: Thirtycal
TEXT & PHOTOGRAPHY: Thirtycal
E-MAIL: thirtycal@comcast.net
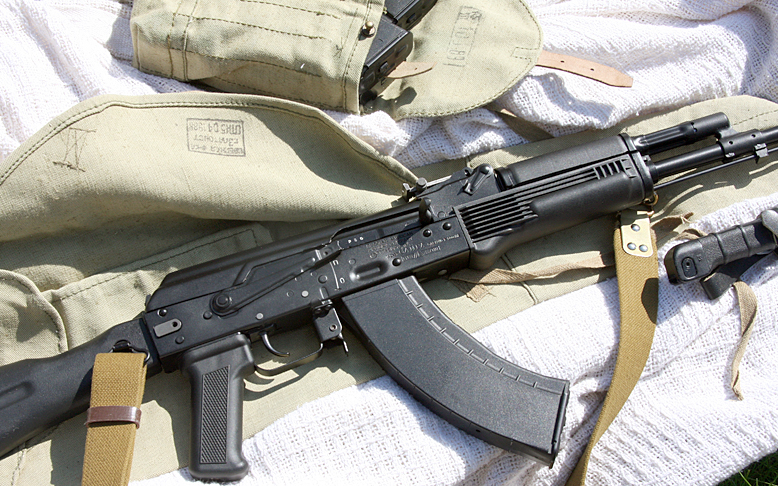
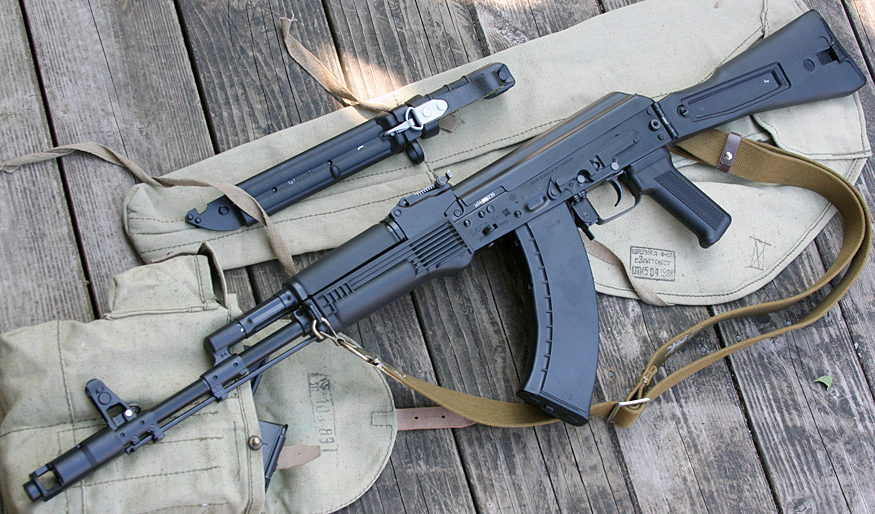
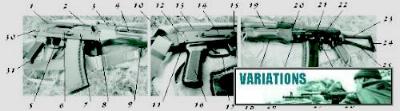
ABOVE: This rifle started life as a 7.62x39 Saiga sporter rifle. Civilian Saigas are built at the Izhmash factory (the home of the AK) – the same factory which produces 'real' AK-103 rifles for military export. The Saiga sporters are imported in a ban (or 'sporting') configuration, which basically means that they have been neutered of all features which would lend the outward appearance of a military firearm. Despite the cosmetic differences, lurking inside every Saiga sporter is the true DNA of a Kalasnikov rifle. When starting with a fully functional Saiga sporter, it's more common to say that one “converts” a Saiga rather than one “builds” a Saiga... but in the case of a detailed AK-103 conversion there is a lot of work involved, which in my opinion more than qualifies as a “build”. Despite the fact that the uninitiated tend to label any converted Saiga an “AK-103”, in reality a factory AK-103 has a folding buttstock, not a fixed buttstock.
A key feature of this particular rifle are the magazine well dimples and extra receiver stampings which suggest a military heritage. These features are typically ommited on civilian/export semiauto Saiga rifles. However, it is widely believed that as a result of Venezuelan president Hugo Chavez's order of 100,000 AK-103 units from the Izhmash factory in 2005, most of the 2006 Saiga sporter rifles were built literally alongside the contract AK-103 production run for the Venezuelan army (which ended in late summer 2006). As a result, a certain folklore has developed around these unique 2006 Saiga rifles, suggesting that the rifles used “overrun” parts from the Venezuelan production contract. I tend to believe there is some substance to this story, although it is important to recognize that these rifles do not violate any US import or BATF regulations regarding semiauto firearms.
This rifle is the result of a year-long effort to create the best AK-103 clone that I could build in my own garage. Among the most difficult tasks were the three months I spent constructing all of the tools necessary to accomplish the build. Although it was a considerable time investment, taking the time to design and build all of my own tooling was a very important step – and there were many steps along the way where I had to modify my original tools (and tactics) to perform the intended task correctly.
The photos above show the Saiga AK-103 clone in it's natural habitat of period-correct web gear, with bayonet. The magazine in the photo is a modern Polish polymer ribbed 'slabside' design, which is very close in appearance to the correct Izhmash magazine (which I someday hope to find). The sling is an early 2000's Soviet “mustard” web sling, which is considered by most to be a correct accessory. For a very durable yet factory-like finish, I chose a 50/50 mixture of semi-gloss and matte Norrell's Molyresin. This is a thermally bonded resin-based finish which, when applied over fresh Brownell's zinc phosphate parkerizing, yields about the toughest finish one can achieve in their garage. Although it is somewhat smoother in texture than the true AK-103 factory finish, the overall 'blackness' and gloss level is very close match.
|
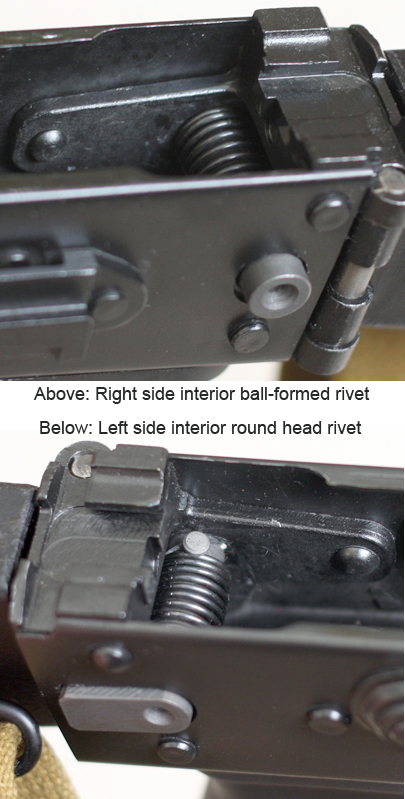
RIGHT: Some of the most difficult details to attend to for this build are not evident from an external inspection of the rifle. In my quest to create a very realistic copy of an AK-103, I decided that I would not only try to make the external (visible) rivet heads correct in size, shape and appearance, I'd do the same for the interior (not visible) rivet heads.
To form the rivets accurately and consistently, I built a rivet jig which (when combined with a 20-ton hydraulic press) allowed me to reach and press all five rivets used to attach the rear hinge block. The upper rivet is a single long “through” rivet, and the other four are smaller single rivets.
As can be seen in the upper photo, I used a 'ball-shaped' mandrel to form round interior rivet heads. I did this to model the interior rivet head size/shape originally found on the Saiga rear fixed-stock trunnion. Even though the round interior formed heads look nice, I later discovered that on a modern AK-100 series rifle, the correct formed interior rivet head is flat! Ooops!
On the left interior of the receiver (lower photo), the forward rivet is unique. It's a longer single rivet which not only holds the rear hinge block, it also is used to attach the side rail optics mount common to all AK-100 series rifles. This interior rivet head is actually not the formed head – the formed head is on the outside, and is set flat to allow optics to slide over the optics rail. This is the only rear hinge block rivet which should have a round interior head.
To lend authenticity, I tried to retain the 'dimpled flat' head which is specific to these correct Russian rivets. In the upper photo, you can see that the center of each flat head contains a very small dimpled recess which is apparently a result of the process used to manufacture the rivet. When setting these rivets, I considered it an important detail to leave this dimple intact, which visibly proves that I didn't file the heads flat to 'simulate' flat Russian rivets. I have collected a photographic library of real AK-74M and AK-100 series rear rivets, and in most of the photos, the dimple is obliterated during the rivet forming operation. However, I have seen photographic examples which retain a very slight centered dimple in the finished rear exterior rivet heads.
As can be seen in the lower photo, only the upper “through'” rivet should be formed with a rounded/domed external head (on the right side). This is correct for all AK-100 series rifles.
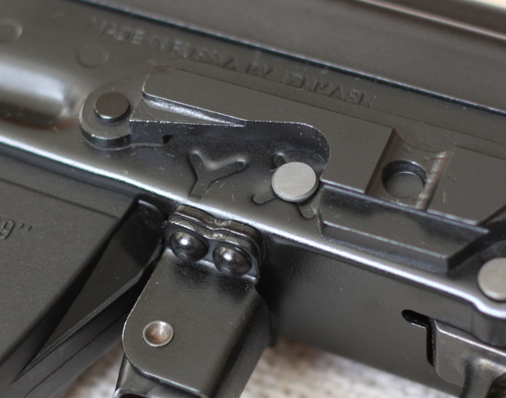
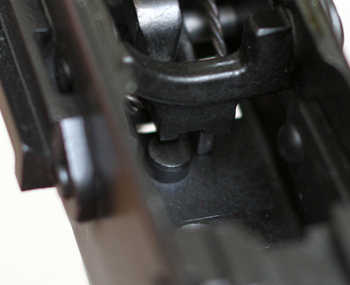
The final detail to mention here is that the bare zinc-phosphate pivot pin and hinge latch mechanism are correctly finished. These should not be painted. Also, the particular style of the latch mechanism is important, since the AK-100 series uses the 'small hole' variant of this part, as opposed to the 'large hole' variant used on the earlier AKS-74 design.
|
 |
|
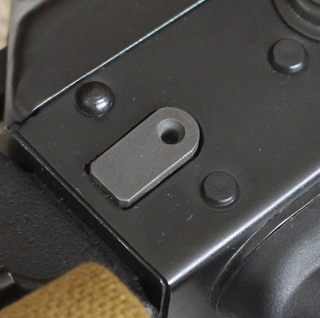 |
LEFT: Before setting the rear rivets, I first had to make the angled cut for the rear of the receiver, as well as the “D”-shaped cut on the right side of the receiver, and the accompanying round hole on the left side. When making these cuts, it's important to “creep up” on the correct dimensions by making a purposely undersized initial cut with a drill and dremel cutoff wheel, and then hand file and fit to the finished size. The difficult part about all of this is getting the contour of the “D” to correctly match the latch mechanism part – any sloppiness or inaccuracy will become obvious (and ugly) when the latch part is placed into the hole.
Again as mentioned earlier, the latch part for the AK-100 series rifles is unique: If you compare the part in this photo to that used in a standard AKS-74, you'll see that the AKS-74 part is nearly hollow, whereas the AK-100 part is nearly solid with only a small hole drilled through it. I can imagine that this change was a result of a the overall improvements made to the rear hinge mechanism to increase strength and rigidity as compared to the AKS-74. Remember that the AKS-74 fires the 5.45x39 round, and with the substantially heavier recoil impulse of the 7.62x39 round, the Izhmash factory obviously recognized that the AK-103 would require a strengthened rear hinge block and latching mechanism.
|
|
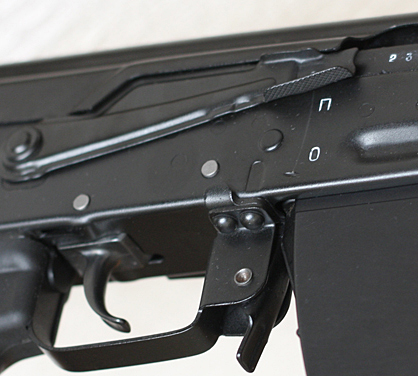
RIGHT: To set the front latch mechanism, I had to locate and drill a hole for the front latch pivot pin, and also cut a rectangular hole for the latch part.
The pivot pin hole goes though the receiver sheet metal and into the bottom of the front trunnion. Care must be taken to not drill too far into the trunnion, otherwise one might drill into the barrel chamber as well. The pin should be installed only after painting the rifle, since the pin head needs to retain the bare zinc-phosphate finish to achieve the correct appearance for an AK-103 clone.
The rectangular hole for the front latch was carefully cut with a dremel cutoff wheel. I purposely cut it undersize so that I could finish it to the correct dimensions with a hand file. A very specific detail can be seen in this photo: To be correct, the corners of the rectangle must have a slight radius to the cut.
Additionally, take note of the so-called “third rivet” which is a feature of all modern AK-100 series rifles. This is a hardened, replaceable pin which assists in bolt locking/unlocking.
|
 |
|
 |
LEFT: In this photo there are two details often lost on many AK-103 style conversions.:
Firstly, the Saiga sporter is imported in a “sporting” configuration, and as such, does not have a correct trigger guard. Properly adding a correct trigger guard is a difficult endeavor, and can be accomplished either by retaining the Saiga's stock magazine latch post and welding on a trigger guard hoop, or by completely removing the latch post and riveting in a new trigger guard. For this rifle, I chose the latter. To accomplish this, I built a trigger guard rivet jig, and a mandrel which would accommodate the fact that the bolt carrier rails are in place (something that the factory doesn't have to deal with when setting the trigger guard rivets). For authenticity, I machined-in the correct Russian 'cloverleaf' trigger guard feature as seen in the photo.
As for the second authenticity detail, I won't mention it specifically, but there is a “uniquey” feature which is present in this rifle, and not present in 99.9% of the other Saiga sporters imported since 2001.
|
|
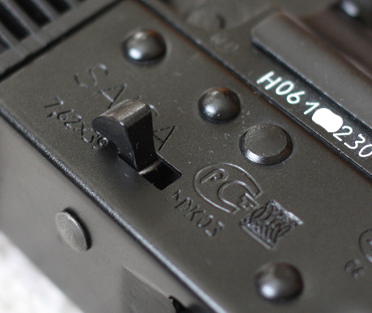
RIGHT: In this photo, there are several details that are somewhat unique to this AK-103 build. The first is the most obvious – the presence of a factory magazine well “dimple”. This is a fairly uncommon detail for Saiga rifles, as this feature is typically omitted for semi-auto export-only sporting rifles. Although this is a subject of controversy, I tend to believe that the primary function of the dimple is to stiffen the large unsupported sheet metal area above the magwell during full-auto fire (which of course is an action this rifle is incapable of performing).
Also, notice that I removed the western 'S'afe and 'F'ire stamps but retained the Cyrillic selector markings. Additionally, I preserved the real Russian sector lever by welding over the incorrectly positioned offset dimple (as is common on all Saiga rifles), and pressing in a new selector dimple in the correct centered location. I also added a correctly-sized semi-auto selector stop divot in the proper location.
Lastly, take note of the 'double-hump' trigger pin boss which is very unusual for a Saiga sporter. I also welded closed all six of the holes that remain after performing the “pistol group conversion” process on a Saiga sporter (one of the holes was just forward of the trigger, but it's no longer there!)
|
 |
|
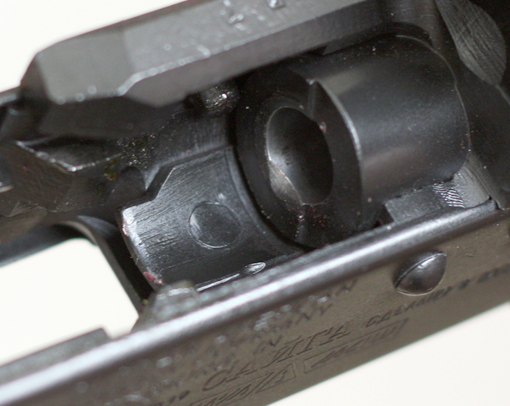 |
LEFT: Perhaps one of the most challenging tasks in this entire build was creating the tooling and procedure necessary to press the recessed rivet that attaches the bullet guide to the trunnion. Saiga sporter rifles do not contain a bullet guide, so every Saiga conversion must add this feature in order to use common doublestack AK magazines.
What makes setting this rivet a challenge for the home builder is the fact that the bullet guide is usually riveted before the front trunnion is riveted to the receiver. Since I didn't want to remove the front trunnion, I had to devise a method to properly form both the top and bottom of the rivet without bending the floor of the sheet metal receiver. This sounds like an easy task, and some have accomplished this by simply shoving a bucking bar into the void between the trunnion and the receiver – but this method may not correctly form the bottom of the rivet and properly 'squeeze' the rivet into the trunnion. After some thought, I devised a press fixture and method which correctly set the rivet without the need to remove the front trunnion from the receiver (which would have necessitated the destruction of the “third rivet”).
|
|
RIGHT: Yet one more detail which is easy to overlook on an AK-103 build is the use of the correct trigger guard rivets – specifically the rear “anti-slap” rivet.
When combined with a correct modern fire control group (like the US-made copy offered by K-Var), the anti-slap rivet prevents the disconnector tail from rotating too far backwards during the bolt cycling process. It is this moment of force applied to the disconnector (during cycling) which translates into a slapping sensation likely to be felt on the trigger finger when firing any Kalashnikov weapon. I do not know the heritage of the anti-slap feature, but I have seen it on demilled AK-74 rifles so I presume this feature was in existence prior to the AK-100 series evolution. I do not know for a fact that the AK-100 series rifles support this feature, but I made an educated guess that it would have been retained from the AK-74 rifles that we know have supported it prior to the AK-100 series.
To set this rivet, I created a custom press mandrel which preserved the large factory rivet head during the rivet forming process. To get this tooling correct required several modifications to my original tool design.
|
 |
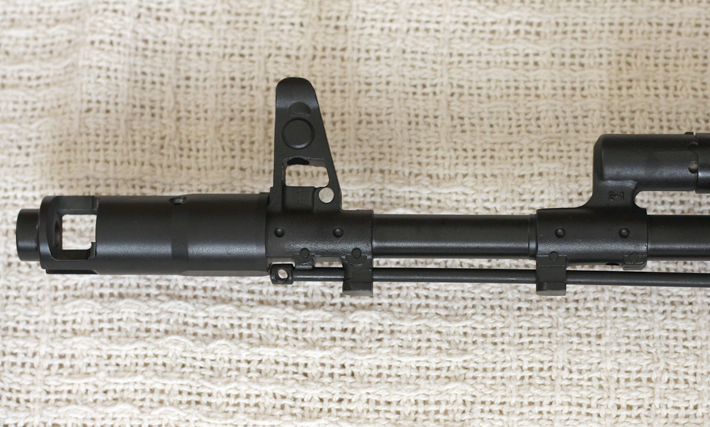
ABOVE: As is true for most manufactured goods today, the Izhmash factory has applied cost and time reduction techniques to their manufacturing line. As evidence, consider the punch-press method for gas block and front sight block attachment. Not only is this method faster than drilling four precision holes and then aligning/pressing four pins, it presumably is also cheaper because there are fewer consumables (i.e., drill bits) and less precision equipment (i.e., drilling and alignment fixtures). Instead, the factory places the front half of the barrel into a single fixture whereupon all eight punch points are simultaneously formed with horizontally-opposed hydraulic rams. This method leaves evenly spaced 'divots' on the outside of the gas block and front sight blocks, which I have attempted to simulate with attention to shape, depth, size, and spacing. The muzzle break is a US-made copy of the correct 'long collar' half-moon ported brake used on the factory AK-103. The cleaning rod is a Russian RPK-74 length cleaning rod which I bisected and rejoined to achieve a factory-correct length.
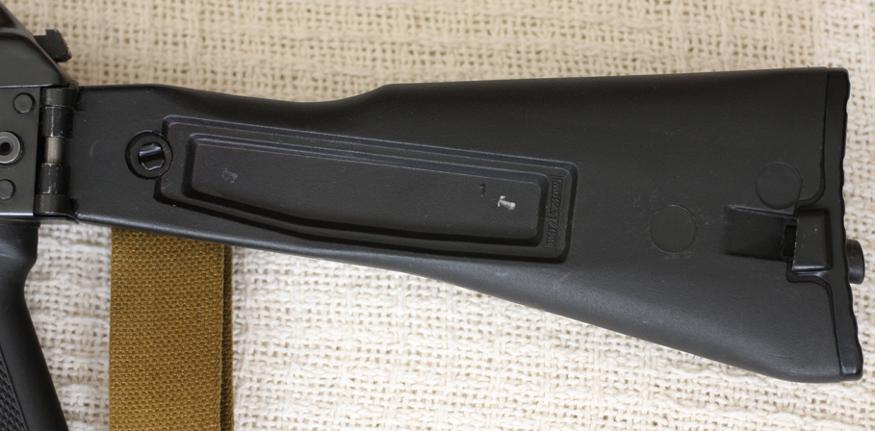
ABOVE: Wherever possible (both in terms of availability and affordablity), I tried to use original Russian parts for this build. Examples as such are the real Izhmash factory buttstock above, and the correct modern Russian “half-tick” sight leaf below. The buttstock is the modern AK-100 variant which uses a larger 5.5mm pivot pin, and a less slack hinge angle of 4 degrees (as compared to the 4.5mm / 6-degree hinge as found on the previous generation AKS-74). Some items were used that are of Bulgarian manufacture, such as the gas block and front sight block, but this was done out of necessity because at the time of the build these were considered to be of the most correct configuration available.
|
 |
LEFT: Among the more
difficult parts to find (at the time of the build) was this correct modern
AK-100 series 1000-meter “half-tick” rear sight leaf. I was lucky to
acquire the very last specimen of this part that Tantal had. This part is
finished in zinc-phosphate and is identified not only by the half-tick
marks (which are different than the full-tick marks used on the AK-74 and
AKM sight leaves), but also by the Cyrillic P. For correctness, this part
should not be painted, so I installed it as one of the final steps during
the build.
|
Not all AK-100 series
rifles use this part. The carbine-length rifles (like the AK-104 and
AK-105) use a similar sight leaf, but is only marked to 500 meters. These
are even more difficult to find, but can be custom made by engraving the
additional 4 and 5 markings on the 300 meter sight leaf that comes on the
Saiga sporter rifle.
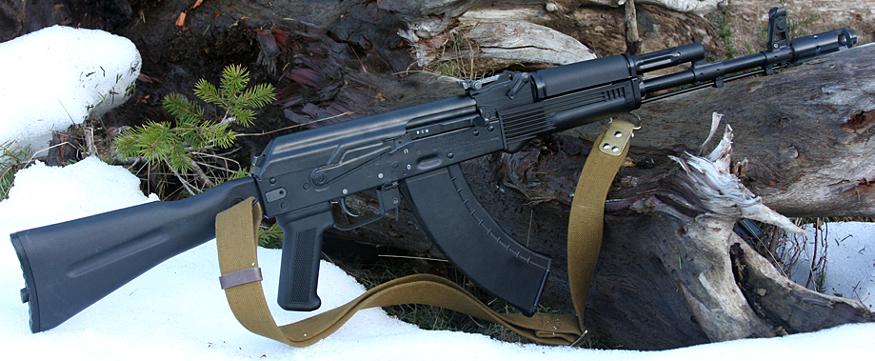
ABOVE: My
favorite glamor shot: The AK-103 clone in the snow. Considering the location of
the Izhmash factory in Izhevsk, Russia (in the cold Urals mountains), I can't
help but think that this rifle must have felt very much at home sitting there
posed on a snow-covered mountain in Washington state. This was such a fun build
that I have decided to do it all over again, this time with an Izhmash 5.45x39
AK-105 project. Unfortunately I can't own an SBR as a WA state resident, so I'll
have to use an extended muzzle break to bring the barrel length to just over
16”. Other than that, I plan on making it as close to original as possible – but
hopefully this one won't take a year to complete.
Thanks Tantal for allowing me to share this build,
and for providing me with many of the authentic Russian parts that I used on
this project.
 See our AK-74 Production Variations Study by clicking the link above. See our AK-74 Production Variations Study by clicking the link above.
 AK Projects Section Index

|